
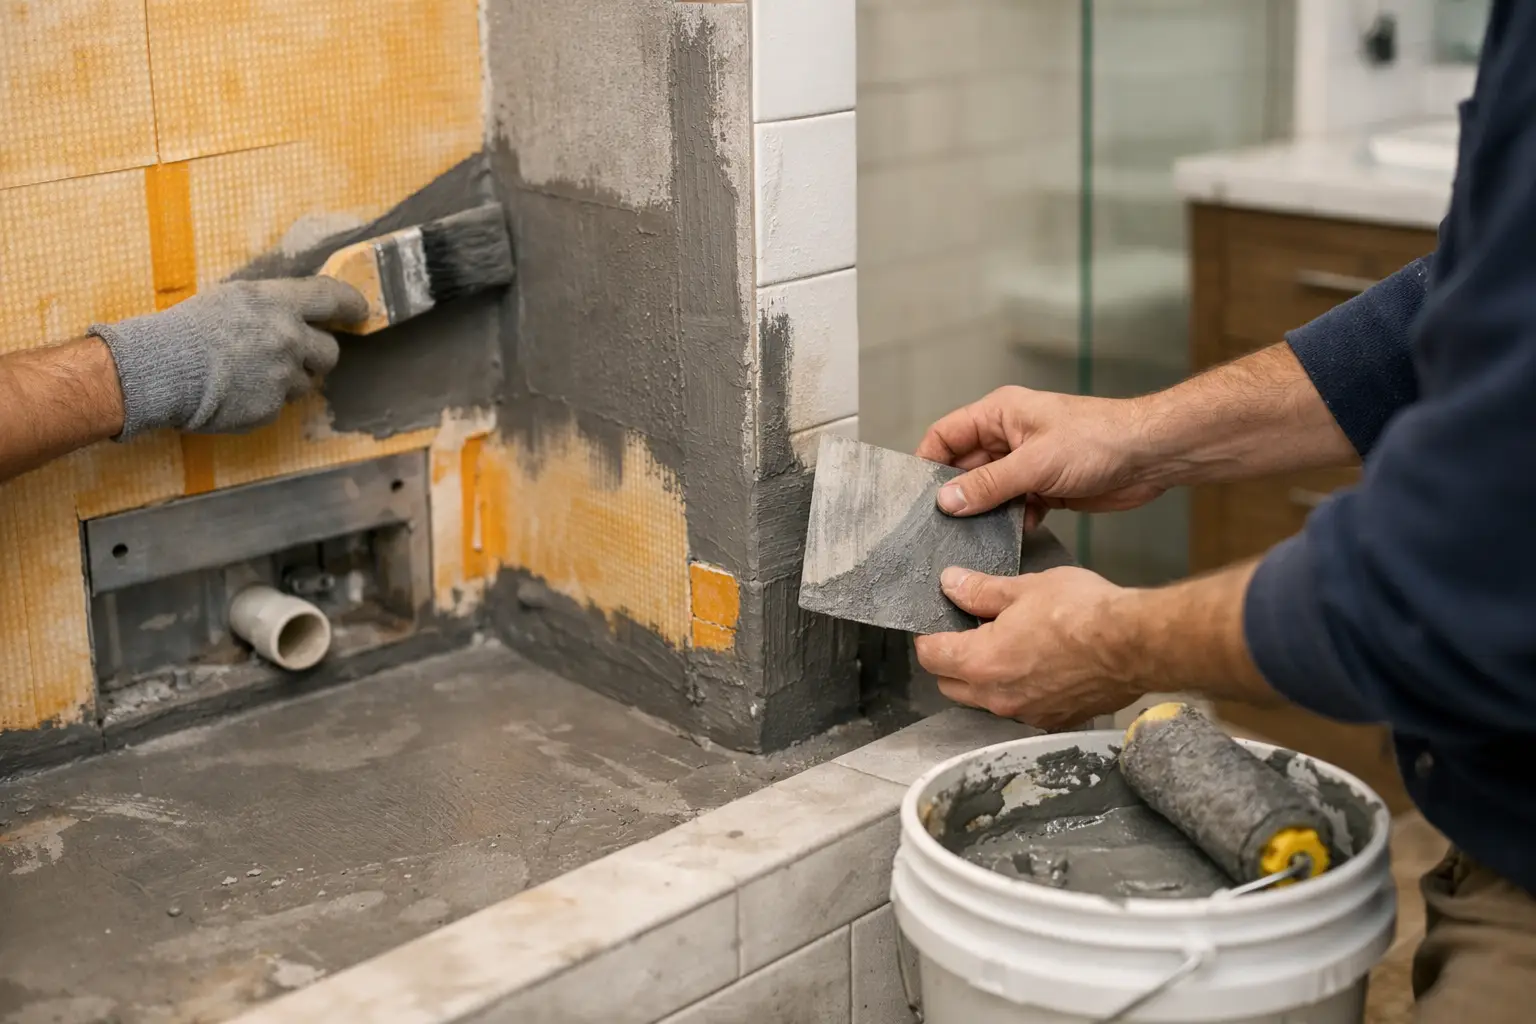
A tiled shower can look finished long before it is protected. Tile and grout are decorative wear surfaces, not a waterproof barrier. Water can pass through grout joints, around fixtures, and into small cracks over time. Knowing how to waterproof shower walls means building a continuous water-management layer behind or directly beneath the tile – one that directs moisture back to the drain instead of into framing, insulation, or the room below.
For Dallas-Fort Worth homeowners, this detail matters because many bathroom repairs begin behind a wall or below a shower pan. By the time drywall feels soft, trim swells, or a ceiling stain appears downstairs, moisture may have been present for months. A properly waterproofed shower is not just a tile installation. It is a system.
Start With a Solid, Suitable Wall Surface
Waterproofing membranes need a stable substrate. In a shower surround, that usually means cement backer board, fiber-cement board, foam tile backer board, or another manufacturer-approved shower panel. Standard drywall is not appropriate inside a conventional tiled shower, even if it will be covered with tile.
Before installing boards, inspect the framing. Studs should be straight, plumb, and in the same plane. Correcting bowed studs now prevents uneven tile later, but it also helps membranes and seams lie flat. Add blocking where needed for grab bars, shower doors, niches, benches, and plumbing valves. These items often create the penetrations and transitions where leaks start.
Fasten the backer board according to its requirements, keeping fasteners where they can be properly covered by the waterproofing system. Leave the specified gaps between panels and at changes of plane. Do not fill those gaps with ordinary drywall compound. The goal is a clean, firm base that is ready for waterproofing, not a wall that merely looks smooth.
Choose One Shower Waterproofing System
There are two common approaches for waterproofing shower walls: a liquid-applied membrane and a sheet membrane. Both can work well when installed correctly. Problems often occur when materials from different systems are mixed without confirming that they are compatible.
Liquid-Applied Membranes
A liquid membrane is rolled, brushed, or troweled onto the wall surface. It is practical around corners, niches, and irregular layouts because it conforms to the surface. After it cures, it forms a flexible, continuous coating behind the tile.
The trade-off is thickness control. Applying a coat that looks solid is not the same as applying it at the required dry-film thickness. Most products require multiple coats, with each coat allowed to dry before the next one is applied. Thin spots, pinholes, skipped fastener heads, and rushed dry times can leave weak areas that are difficult to see once tile is installed.
Use a wet-film gauge if the product calls for one, and follow the manufacturer’s coverage rate rather than guessing. Reinforcing fabric may be required at corners, board seams, and other transitions.
Sheet Membranes
Sheet membranes are bonded to the backer board with thinset mortar or a manufacturer-specific adhesive. Seams overlap or are sealed with matching banding material, creating a waterproof layer directly behind the tile.
This method makes it easier to verify coverage because the membrane is visible, but it demands careful seam work. Each overlap must meet the system requirement, and every corner, pipe opening, niche edge, and fastener must be sealed. A wrinkled sheet, an unbonded edge, or a missed overlap can become a direct path for water.
Foam shower-board systems are another option. These panels may include an integrated waterproof face, but their seams, screw washers, corners, and penetrations still need the matching sealant or banding. No panel is automatically waterproof once it has been cut and fastened to the wall.
How to Waterproof Shower Walls at Seams and Corners
Seams and changes of plane deserve more attention than broad, flat wall areas. Water follows paths of least resistance, and a shower moves slightly as the home settles and materials expand or contract. Wall-to-wall corners, wall-to-floor connections, bench joints, curb edges, and niche corners all need flexible, continuous treatment.
With a liquid membrane, embed reinforcing fabric in the first coat where the product requires it, then cover it fully with additional membrane. With a sheet system, use preformed corners or carefully installed membrane pieces that maintain the required overlap in every direction. Avoid cutting a single piece in a way that creates an unsealed slit at the inside corner.
Do not rely on grout or caulk to correct an incomplete waterproofing layer. Flexible sealant at tile changes of plane is useful, but it sits on the finished surface. The waterproof system behind the tile must already be complete.
Treat Niches, Benches, and Plumbing Openings as Leak Risks
A shower niche is convenient, but it interrupts the wall field and adds several corners. Preformed niches simplify the work when they match the chosen system. If a custom niche is framed on site, it needs a firm substrate, fully sealed corners, and a slight slope on the bottom surface so water drains back into the shower instead of pooling against the back wall.
Benches require the same discipline. Their tops should slope toward the drain, and every horizontal surface needs complete waterproofing. A flat bench top may hold water at grout joints even when the tile work looks excellent.
At the shower valve, shower arm, body sprays, and other plumbing penetrations, use the approved seals, gaskets, or membrane patches. Cut openings only as large as necessary. The trim plate may cover the hole visually, but it is not a dependable waterproofing detail on its own.
Connect the Walls to a Proper Shower Pan
Walls cannot be waterproofed in isolation. The wall membrane must connect correctly to the shower pan or receptor so water that reaches the waterproof layer is directed to the drain.
For a traditional mortar-bed shower, this usually involves a properly installed liner and wall detailing that does not puncture the liner in critical lower areas. For surface-waterproofed showers, the wall membrane is tied into a compatible bonded waterproof pan and drain assembly. The exact method depends on the system, but the principle remains the same: water should never be trapped behind tile with nowhere to go.
This is one reason shower remodels require more planning than a simple wall tile project. A new wall membrane paired with an old, questionable pan can leave the most important failure point untouched. If the shower floor, drain, or curb has signs of leakage, a full system rebuild is often the more reliable repair.
Perform a Flood Test Before Tile Goes Up
A flood test is one of the best ways to find a shower-pan problem before expensive finishes cover the work. After the waterproofing and drain connection are complete, the drain is temporarily plugged below the drain opening and the shower base is filled with water to the appropriate level. The water level is marked and checked after the required test period.
The test should be performed only after the waterproofing has cured as directed. Check for a drop in water level and inspect adjacent areas, including the ceiling below when accessible. Evaporation can affect a reading, so control conditions as much as possible and follow local inspection requirements.
Wall waterproofing itself is also worth inspecting closely before tile. Look for incomplete seams, loose membrane edges, thin liquid coating, exposed fasteners, unsealed corners, and gaps around plumbing. Tile installation should begin only after those details are corrected.
Avoid the Shortcuts That Cause Hidden Damage
A few shortcuts repeatedly lead to shower failures. Installing tile directly over drywall, relying on cement board without a membrane, applying only one thin coat of liquid waterproofing, and skipping corner reinforcement are common examples. So is using mastic adhesive in a wet shower area when a cement-based thinset mortar is the appropriate choice.
Another issue is placing waterproofing on both sides of a wall assembly without understanding moisture movement. For example, combining a moisture barrier behind backer board with a surface membrane can trap moisture between layers in certain designs. Choose one approved waterproofing approach and follow it from the shower pan through the walls.
A clean-looking grout joint does not prove the shower is dry behind the tile. Grout requires maintenance, and even well-sealed grout is not a substitute for the waterproof layer. Sealing grout can help with staining and cleaning, but it should never be treated as the main defense against leaks.
When to Bring in a Shower Remodeling Professional
A straightforward shower wall may be manageable for an experienced DIY installer who can follow one complete manufacturer system. However, professional installation is often the practical choice when plumbing is being moved, a curbless shower is planned, a bench or large niche is included, the subfloor needs repair, or there is suspected water damage behind the existing walls.
The details are connected: framing affects tile layout, plumbing affects penetrations, the pan affects the wall transition, and waterproofing affects the longevity of every finish installed afterward. Wisez Improvement approaches bathroom work with that full-system view, whether the project calls for a shower conversion, tile replacement, plumbing correction, or a complete remodel.
Before selecting tile color or glass style, make sure the work behind the wall is planned with equal care. A shower that drains correctly, seals every transition, and passes testing gives the finished bathroom the foundation it needs to stay comfortable and dependable for years.